DIY Chalk Painted Bench
Without a doubt, the number one DIY question I get is about using chalk paint! So I’m excited to share this simple step-by-step tutorial of my FINAL One Room Challenge kitchen makeover project featuring a Chalked painted vintage bench!
Click HERE to watch a quick how-to video!
Before

After

Materials
•Chalked Paint in “Tate Green”
•Chalked Clear Protective Topcoat
•Gator medium/ fine grit sanding sponge
•Disposable gloves
•Lint-free rags
•Synthetic paint brush
•Drop cloth

How-To Instructions
It’s incredibly important to ensure your furniture piece is clean prior to painting! I love using a product by Krud Kutter called Gloss-Off because it cleans and deglosses the surface WITHOUT the need to sand… WINNING!!! Plus, it’s non-toxic and doesn’t require rinsing!

I gave the bench a quick wipe down using a lint-free cloth, and then I allowed it to dry for about 10 minutes before I started to paint.

Chalked paint is one of my favourite mediums to work with because it doesn’t require priming, it’s easy to apply, and it dries super fast! I used a gorgeous new hue called “Tate Green” and applied two coats generously with a brush.

TIP: When applying Chalked paint, it often looks bad before it looks good, so if you’re thinking that you’re doing it wrong during the first coat, that means you’re probably doing it right! Apply it thick and don’t worry about drips and unevenness…. since it’s a soft finish, it smooths out beautifully with a light sand after painting, which brings me to the next step…

Using a medium / fine grit Gator sanding sponge, give all surfaces a light hand sand to create a velvety finish.

I applied more pressure on the edges and sanded down to the original wood finish for a unique distressed look that added a touch of rustic character.
TIP: The sponge is perfect for sanding around awkwardly curved areas like spindles and chair legs.

I thoroughly wiped down all surfaces with a lint-free cloth to remove all dust and debris from sanding, and then it was ready for the final step.

Using a good quality synthetic paint brush, I applied one even coat of the Chalked clear protective topcoat. Ensure that you brush consistently in the same direction, and avoid over-brushing areas that have already been coated.

The clear coat is super important for adding durability and protection, and it also greatly enhances the colour and creates a smooth matte finish.

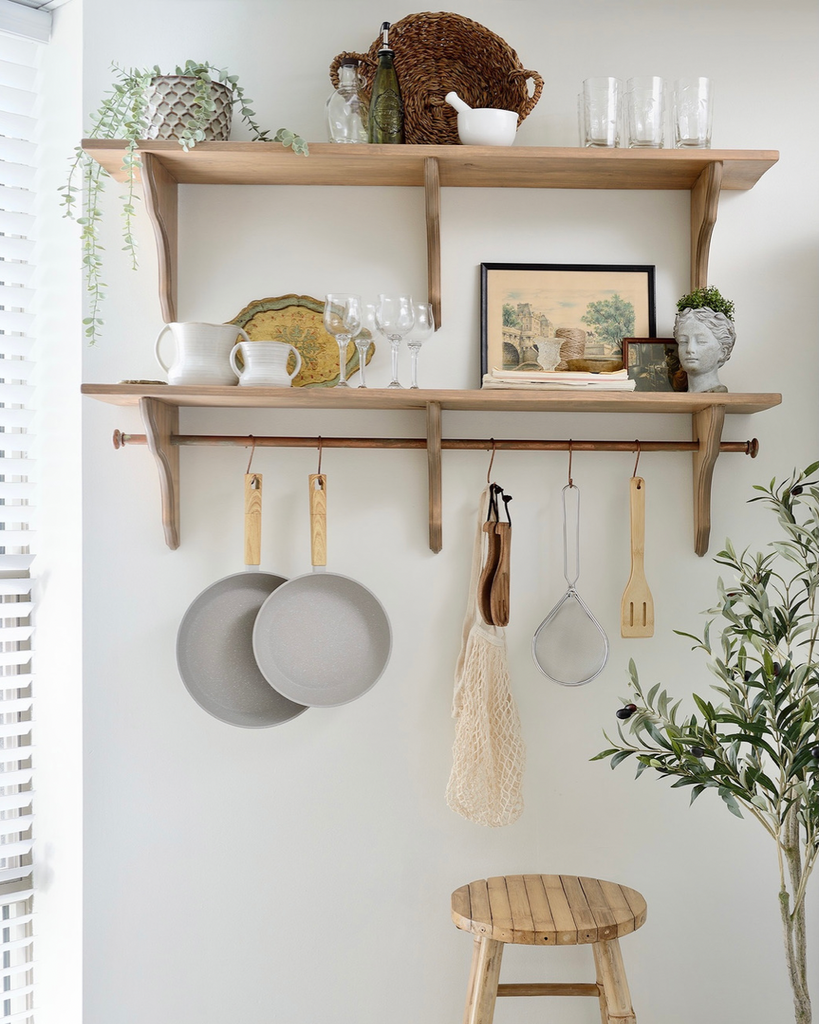
Next week is the FINAL REVEAL of my completed kitchen makeover takeover, but until then, here’s a tiny sneak peek of the bench in it’s new bistro nook…. EEEEEKKKKKK!!!!!!!

What do you think?